
In blockchain Ethereum with OpenZeppelin library series article, Biastek would like to show 4 parts with the contents in below list. The content of this guideline com from OppenZeppelin
Part 1: Install OpenZeppelin and Ganache, Compile và Deploy Smart Contract, Interact với Web3
Part 2: Write an Unit Test for Smart Contract
Part 3: Connect to Public Blockchain ( testnet) with Infura API
Part 4: Upgradeabe Smart Contract
Let’s start with Part 1: Install OpenZeppelin and Ganache, Compile và Deploy Smart Contract, Interact với Web3. We divide it into to 4 steps :
- Install necessary environment
- Set up Zepplin and Compile Smart Contract
- Deploy smart contract
- Interact với Web3
1. Install necessary environment
- Install OS: Ubuntu 18.04
- Install Node and Git
1.1 Installing Node
$ sudo apt update
$ curl -sL https://deb.nodesource.com/setup_10.x -o nodesource_setup.sh
$ sudo apt install nodejs
$ nodejs –v
Output
v10.14.0
$ npm –v
Output
6.4.1
1.2 Install Git
$ sudo apt install git
$ git –version
Output
git version 2.17.1
2. Cài đặt Zepplin và Compile Smart Contract
2.1 Create project
$ mkdir ZepplinProject
$ cd ZepplinProject
$ npm init –y
2.2 Install openzeppelin CLI
$ npm install –save -dev @openzeppelin/cli

$ npx openzeppelin init

2.3 Compile contract
$ npx oz compile or $ npx oz compile –solc-version=0.5.12 –optimizer on

3. Deploy Smart Contract
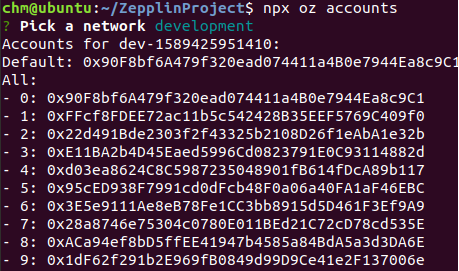
when we install Ganache, it will create for us 10 accounts which are used to deploy smart contract and execute the transactions
$ npm install –save -dev ganache-cli

$ npx ganache-cli –deterministic

Open another terminal, check default account with below command line
$ npx oz accounts

get balance command line, Gananache will allocate to an account 100 ETH
$ npx oz balance

Create simple smart contract Box.sol with the content like below:
/ contracts/Box.sol
pragma solidity ^0.5.0;
contract Box {
uint256 private value;
// Emitted when the stored value changes
event ValueChanged(uint256 newValue);
// Stores a new value in the contract
function store(uint256 newValue) public {
value = newValue;
emit ValueChanged(newValue);
}
// Reads the last stored value
function retrieve() public view returns (uint256) {
return value;
}
// Increments the stored value by 2
function increment() public {
value = value + 2;
emit ValueChanged(value);
}
}
Deploy smart contract with “create” command line
$ npx oz create

call the functions which write data to blockchain, in this example, it is store() function
$ npx oz send-tx

Call the functions which read data from blockchain, in this example, it is retrieve() function
$ npx oz call

4. Interact với Web3
$ npm install web3 @openzeppelin/contract-loader

Create a file src/index.js with the content like below
const Web3 = require(‘web3’);
const { setupLoader } = require(‘@openzeppelin/contract-loader’);
async function main() {
// Set up web3 object, connected to the local development network
const web3 = new Web3(‘http://localhost:8545’);
const loader = setupLoader({ provider: web3 }).web3;
// Set up a web3 contract, representing our deployed Box instance, using the contract loader
const address = ‘0xCfEB869F69431e42cdB54A4F4f105C19C080A601’;
const box = loader.fromArtifact(‘Box’, address);
// Retrieve accounts from the local node, we’ll use the first one to send the transaction
const accounts = await web3.eth.getAccounts();
// Send a transaction to store() a new value in the Box
await box.methods.store(20)
.send({ from: accounts[0], gas: 50000, gasPrice: 1e6 });
// Call the retrieve() function of the deployed Box contract
const value = await box.methods.retrieve().call();
console.log(“Box value is”, value);
}
main();
$ node src/index.js

Congratulations! We have done the part 1!!!!
Hạnh phúc là lựa chọn và trải nghiệm
Blockchain Ethereum – Ví dụ về hàm Delegatecall trong solidity
Blockchain Ethereum (P4) – Kết Nối Các Node Sử Dụng Bootnode
Blockchain Ethereum (P3) – Cài Đặt Private Blockchain trên nền tảng Ethereum
Install web3 and nodejs
Sử dụng Virtual Box